
I wake up tight and stiff, roll on my side and start my morning routine. I forget to stretch and rush to work, standing and carrying heavy things all day. After work, I head home and feeling warmed up from all the lifting and standing, I think “I don’t need much of a warm-up today.” I start with deep side stretches and feel a little pop in my left hip which sends this feeling of relief into my left side body. As the days melt into each other, I forget about that pop and continue my regular practice. Until a couple weeks later, when I start to feel pain in my left hip, glute, and hip flexor, lucky me. I strained my hip flexor and piriformis.
I HATE it when I injure myself absent mindedly! Nothing is more frustrating than having to nurse an injury and set your practice on the back burner. But good news! I have some moves to help you get those stiff hips and glutes to relax.
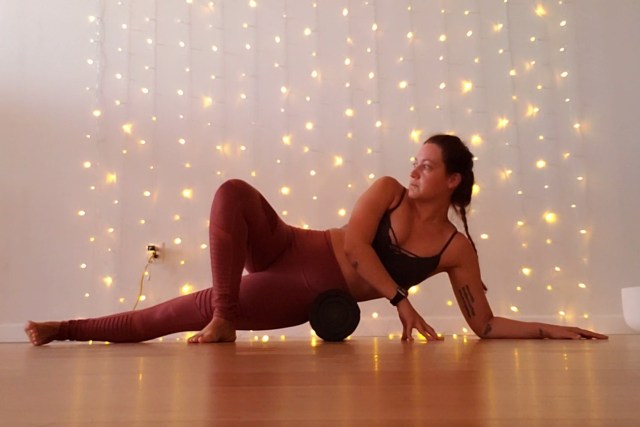 A foam roller is the greatest invention for hip and glute tightness! Place the bolster under your hip, laying on the side that is plaguing you, keeping that leg straight. Bend the other knee, planting the foot down in front of the straight leg. Use that planted foot to help you roll you body over the bolster, massaging your aching hip. Keep rolling until you start to feel some relief.
 Roll onto your back so that the foam roller is under your glutes now. Keeping the afflicted side’s leg straight, bend the other knee and plant the foot on the floor. Use the planted foot to help you roll your body over the bolster, massaging your tight glute. Again keep rolling along the glutes until you begin to feel some release in the muscles and connective tissues.
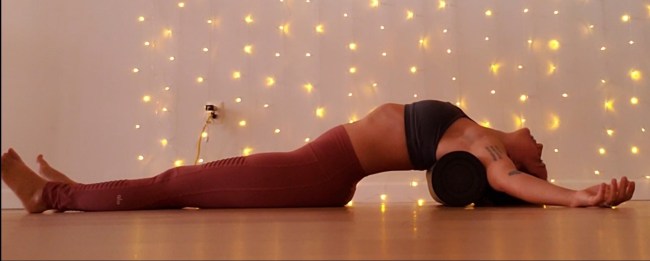 Continue to roll your body over the foam roller along the length of the spine until it rests under the shoulder blades, releasing the arms out. In this supported fish pose, you should feel a nice release along the spine, especially in the low back.
 After you get some pain relief from the foam roller, put it to the side and lie on your back. Keep your knees bent, feet flat on the mat. Then, identify the side which is painful and cross that ankle over the other knee. Just rest here, breathing deeply for at least 5 deep breaths, allowing your glute to release tension.
 Once you begin to feel more release in that glute, reach your hands around the hamstring of the planted foot, keeping your back flat against the mat. In this reclined pigeon pose, you should begin to feel a release deeper in the glute.
 You can always keep the knee bent, or you can choose to straighten out the knee. This gives you an added stretch along the hamstring. You can keep your hands behind the hamstring, or you can reach up and hold behind the calf. Play with flexing and pointing the toe to find the appropriate amount of stretch in the hamstring. After 5-10 breaths, you can release the leg back to the mat and uncross the leg.
 Hug your knees into your chest and roll back and forth until you come up to a seated position. Gently stack one leg on top of the other, aligning the ankle and knee on each side. Lengthen up through the torso, creating and maintaining a flat spine. Here in fire log pose, turn your attention to your breath, actively releasing tension in the hips and glutes on each exhale. Visualize your gluteal muscles lengthening. Stay in this pose for about 5-10 breaths. Repeat on the other side if it feels good.
Remember to be kind yourself while your body is healing. If you’re anything like me, consistently remind yourself NOT to engage in regular practice including deep lunges, backbends, side bends, and twists until you feel no pain. Keep it very gentle and basic until your body is healed.
Take this time to practice mindfulness and meditation. I know I will 🙂
Have a great Friday! See you next week.
Peace and Love,
Melissa

Excellent, thanks for sharing your personal experience.
LikeLike